
6 Easy Ways to Froth Milk at Home (Without Expensive Machinery)
You don’t need to be a barista with expensive equipment to make a cappuccino, latté, cortado, or any other milk-based coffee drink at home.
Most of the materials you need are probably in your kitchen already!
In this post, I’ll teach you 6 ways how to froth milk at home quickly and easily, so you’ll be able to serve near café-quality coffee drinks to your family and friends.
The resulting milk froth will be comparable to what you would get by using a steam wand on an espresso machine (but it won’t be quite as perfect).
First, let’s review some basic things you need to know before learning how to make frothy milk.
Milk frothing basics
Before going into the details of how to froth milk, there are a few essential things you need to know to get the best quality milk foam in the end.
What is milk frothing?
The term “frothing” describes the process of creating bubbles in milk by either blowing air into it or heating it.
When milk is frothed, the air bubbles that are formed adhere to each other and create a foamy layer on top of the milk. This happens because the proteins in milk (casein and whey) are attracted to the air bubbles.
The more agitation is used when frothing milk, the more foam will be produced.
What’s the difference between frothing and steaming milk?
While frothing relies on the aeration of the milk to create bubbles and make that foamy texture, a steam wand uses heat and pressure for this process. This is why frothed milk can be cold (more on this later) and steamed milk is always hot.
As a result, steamed milk is creamy and smooth while frothed milk has an airy and light texture.
Which milk produces the best foam?
The type of milk you use makes all the difference. You’ll get the best milk froth from fresh whole milk, with a fat content of around 3.5% and a relatively high protein content of about 3.3%. Don’t use nonfat milk.
A high protein and a high-fat content ensure that the milk is easy to froth and that the frothing result is creamy and stable.
Fat is also a flavor carrier, so a high-fat content ensures that your foam crown tastes good in the end!
You don’t need to worry about the calories, it hardly makes a difference whether you use milk with 1.5% or 3.5% fat content. For a cup of cappuccino, the difference is only about 20 calories. You only need to take two flights of stairs instead of the elevator to burn off the calories, plus you enjoy a much better cup of coffee!
Can you froth plant-based milk alternatives?
The plant-based milk alternatives may have a lower protein and fat content, but vegan coffee fans don’t have to miss out on the frothy topping.
Many are switching to non-dairy alternatives for various reasons. Thankfully, the selection of plant-based drinks is large, so you’ll surely find something to your liking. The best milk substitutes to use for steamed milk and frothy milk are:
- soy milk
- oat milk
- almond milk
- hemp milk
Barista tip: Look for “barista” style plant-based alternatives on the packaging. The manufacturer adds extra fat (coconut oil) and protein to the beverage to make it suitable for frothing.
What temperature should the milk be for best frothing?
The best temperature for milk to form and hold froth is its scalding temperature, around 60-65°C (140-150°F).
Barista Tip: Don’t have a thermometer handy to check the temperature of the milk? Use the finger test: hold your finger briefly in the heated milk to check whether it is at the right temperature. The milk should be warm to the touch without burning yourself.
As milk is heated, the bond between fats and proteins loosens. Air gets into the milk when it is foamed, and this air is surrounded by protein molecules and can no longer escape.
You can heat your milk on a stovetop or microwave on medium heat. You’ll know it’s at the right temperature when steam starts rising from the hot milk and the first bubbles appear.
Be careful, though! Froth on too hot milk will become very dense and eventually collapse. Plus, burned milk becomes bitter to the taste.
Can you make cold milk froth?
Yes, you can make cold milk froth! You’ll need a frothing pitcher, some cold milk, and a frothing wand (or a frothing machine), as I’ll describe below.
There are all sorts of delicious beverages in which you can use cold milk froth, even iced drinks! One of my favorites is cold brew coffee with milk froth – it’s the perfect pick-me-up on a hot day.
You can also use milk froth to make cold chocolate milk, an iced latte, or even use it as a topping for a fruit smoothie. The possibilities are endless – get creative and experiment to find your favorite cold drinks!
Now that you’ve read the above, you’re ready to learn the best methods for frothing milk at home.
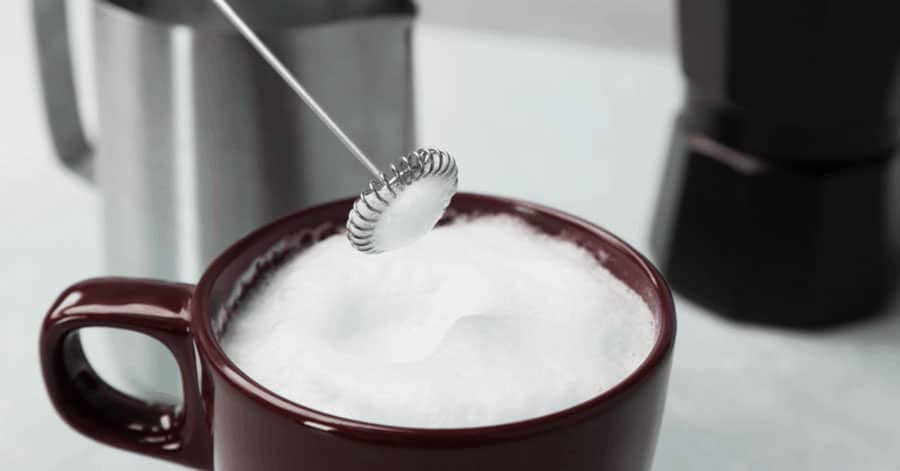
Method 1 – How to froth milk with a battery-operated milk frother
If you don’t have a fancy espresso maker with a steam wand at home, then the most popular method of frothing milk is probably to use a battery-powered handheld milk frother.
This little magic wand is a great tool to have in your kitchen because it is:
- small
- easy to use anywhere
- costs less than $10
The main component of a handheld milk frother is the rotating spiral (the so-called whisk). Insert batteries, and you’re ready to go.
Instructions on using a handheld milk frother wand:
- Pour milk into a tall glass (no more than half full).
- Heat the milk to about 60° over medium heat.
- Hold the wand in the milk (do not touch the bottom) and move it up and down until foamy bubbles form.
- When you obtain the desired consistency, remove the foam from the milk.
- Add the required amount of milk foam to espresso or coffee.
Battery-operated milk frothers are available from many different brands, and they are inexpensive. To ensure that you can always create beautiful milk foam, you should change (or charge) the batteries when the power gets weaker.
Method 2 – Shake milk in a jar
Here is a simple solution if you want to make milk foam without any sort of special frother contraption.
How to make milk froth in a jar:
- Heat the milk to scalding.
- Pour the milk into a mason jar or any screw-top glass. You should fill the glass no more than half full.
- Close it tightly, otherwise, things will get messy.
- Shake it until you get enough milk foam. This usually means 30-60 seconds of shaking.
This method is not as elegant as the others but can be used anywhere, anytime. And remember to use microwave-safe glass if you want to heat the milk in the microwave before or after frothing.
Method 3 – Be quick with a whisk
Another way of making milk foam at home without special frothing tools is to use a kitchen item most households have, a whisk.
This method produces the lowest quality foam, but hey, if you’re out of options, it’ll do.
Here is how to use a whisk to make milk foam:
- Heat your milk to scalding.
- Take a whisk between your two palms and quickly rub the whisk between your palms.
- Foamy bubbles will start forming soon if you’re quick enough.
Admittedly, this procedure is rather strenuous and may not be the optimal solution for someone who wants to froth milk regularly.
However, for “occasional frothers” it is a simple alternative.
Method 4 – French press milk foam
Preparing milk with a French press requires some physical effort. With a bit of practice, you can make milk foam with excellent texture.
The hand-operated milk frother consists of a heat-resistant container and a lid with an integrated sieve rod.
Instructions on using a french press for milk frothing:
- Pour 1 cup (240 ml) of milk heated to scalding (around 60 °C) into the container. It may have a minimum-maximum marking as well.
- Close the container tightly with the lid.
- Move the sieve rod up and down vigorously.
- Then let the milk rest for 30 seconds with the lid closed.
This method may result in the formation of larger bubbles, so you’ll want to pour the milk into a cup and tap it a few times to break the bubbles and make the foam consistent.
By the way, you can get special stainless steel french presses designed for frothing milk.
Method 5 – Use a blender
A blender is a perfect tool to make milk froth at home. You can use an immersion blender or a stand mixer, and the result will be the same.
How do you make milk foam in a blender?
- Add scalding hot milk to the blender
- Blend on high until the milk is frothy
Be careful with the immersion blender method, though. You can make quite a mess.
Method 6 – Use a dedicated electric milk frother
The most comfortable and efficient method for making high-quality milk froth and foamed milk at home is with a proper electric milk frother.
A dedicated milk frother will not only blend the ingredients for a perfect foam but will also heat them evenly and quickly.
This makes frothing easier and more consistent than in other methods.
My favorite is the Nespresso Aeroccino, which can reliably make cold or warm milk froth in about 20 seconds.
Using a milk frother is super easy and convenient. You simply pour in the milk, press a button, and wait a bit.
Make sure to clean the pitcher after you finish, otherwise, the milk residue might stick to the side of the pitcher.
What does perfect milk froth look like?
Milk foam holds some myths and discussions in terms of texture. The choice of baristas is creamy foam (so-called microfoam), because it is excellent to conjure up various latte art results. You need steamed milk using a steam wand for this, though.
Frothed milk is different in that you get larger bubbles in the milk, creating more volume and a lighter feel.
Like everything else, milk froth is a matter of taste.
Ways to use frothy milk
There are so many ways to use frothed milk, I can’t list them all here. You can use it for hot drinks like coffee and chocolate milk, tea drinks, blend the froth with vanilla syrup (or maple syrup) for a sweet treat, and so on.
But since you’ll mostly use it for coffee, here are some of the most popular espresso drink recipes that use milk froth:
- Café au lait: Equal parts coffee and milk, with milk froth on top.
- Cappuccino: 1/3 coffee, 1/3 milk, 1/3 milk foam.
- Flat white: Like a cappuccino, but with less milk froth.
- Latte: 1/3 coffee, 2/3 milk, small layer of milk froth on top.
- Mochaccino: 1/3 coffee, 1/3 milk, 1/3 chocolate milk, milk froth on top.
As you can see, there are many ways to make milk froth without expensive gear. Each has its own unique benefits, but also some drawbacks.
Whether you’re looking for a quick and easy way to make froth for your morning coffee, or you want to impress your friends with your latte art skills, there’s a frothing method for you.
So what are you waiting for? Get frothing!


It’s intriguing to learn that the type of milk affects the froth quality so much. The science behind the fat content and protein creating a better foam was especially fascinating. I’d be interested in knowing if there’s a particular brand or type of milk that you’d recommend as the top tierfor frothing.
Your guide on frothing milk with a French press was a game-changer. I’ve been trying out different methods, but this one definitely produced the best foam yet. It’s comparable to the froth I get from my local café’s capuccinno. Super pumped to try the other methods listed.
I recently gave plant-based milk a whirl in my morning cappuccino and have been struggling to get that perfect froth—so frustrating. Stumbled upon your article and voilà, it’s like you heard my silent coffee prayers. Followed your tips and now I get this creamy, dreamy topping every time. A thousand thanks Tom.
As a barista, I find that frothing milk properly can be quite nuanced in terms of temperature and technique. It’s great that Tom has made it more accessible for home enthusiasts. I would add that for those experimenting with plant-based milks, oat milk tends to froth better than almond milk due to its higher fat content and creamier consistency. It’s worth trying out different brands too, as some are formulated specifically for coffee.
As someone who’s been making frothy drinks for years, I appreciate the comprehensive list of methods here. It’s true what Tom says about whole milk giving the best froth, from my experience. And if anyone’s curious, you can get really creative with the froth designs even without professional tools—practice makes perfect. Perhaps the most useful in your arsenal is the mighty toothpick 🙂
Can someone clarify what the perfect milk frothlooks like? The article touches on this, but I’m not sure I’m getting it right. I’ve tried a couple of methods with whole milk, but I’m still questioning if it’s the rightkind of froth. Maybe it’s the temperature I’m getting wrong?