What is Keurig Sickness? Symptoms, Causes, & How to Prevent It
As a barista, I can’t stress enough how important it is to clean your brewing equipment properly. Not only does this keep your coffee delicious and maintain your machine’s tip-top shape, but not doing so can also lead to some health concerns, such as the notorious Keurig sickness.
If you’re suspicious about your coffee making you sick, then you have to know what could be turning your brew into a pool of unwanted elements.
Read on as I share with you what exactly Keurig sickness is and go in-depth with its symptoms, causes, and some preventive measures.
What is Keurig Sickness?
Keurig sickness refers to the sickness you can get from the mold that gets into your coffee through an uncleaned Keurig coffee maker. To be clear, any coffee machine will have mold if not properly cleaned, even the basket of a drip machine. However, Keurig machines are known to be more prone to these fuzzy organisms because they have parts that are harder to clean.
In this study, the chief microbiologist actually found 6-8 kinds of bacteria and 6 types of mold in a single Keurig.
If you’re feeling ill but can’t pinpoint the cause, you might want to check your coffee machine to ensure that your daily cup of coffee isn’t making you sick.
Why Do Keurig Machines Have Mold?
You might be wondering why your Keurig machine is susceptible to mold growth.
Well, it all comes down to moisture.
Keurig coffee makers have water reservoirs and internal tubing where water can sit for extended periods.
If not properly cleaned and dried, especially the hard-to-reach areas, your machine becomes a breeding ground for these mycotoxins. It only takes 1-2 days for mold to develop and multiply.
But here’s the kicker – molds don’t just magically appear out of thin air (or K-Cups). They actually come from various sources, including the coffee itself. Mold spores can be present in both whole bean and ground coffee if they are not processed, dried, or stored correctly.
So when you brew that cup of joe with your favorite K-Cup pod or freshly ground beans, you could unknowingly be introducing mold into your Keurig machine.
And once the conditions are right – warm and humid – those sneaky little spores will start multiplying like crazy. Yikes.
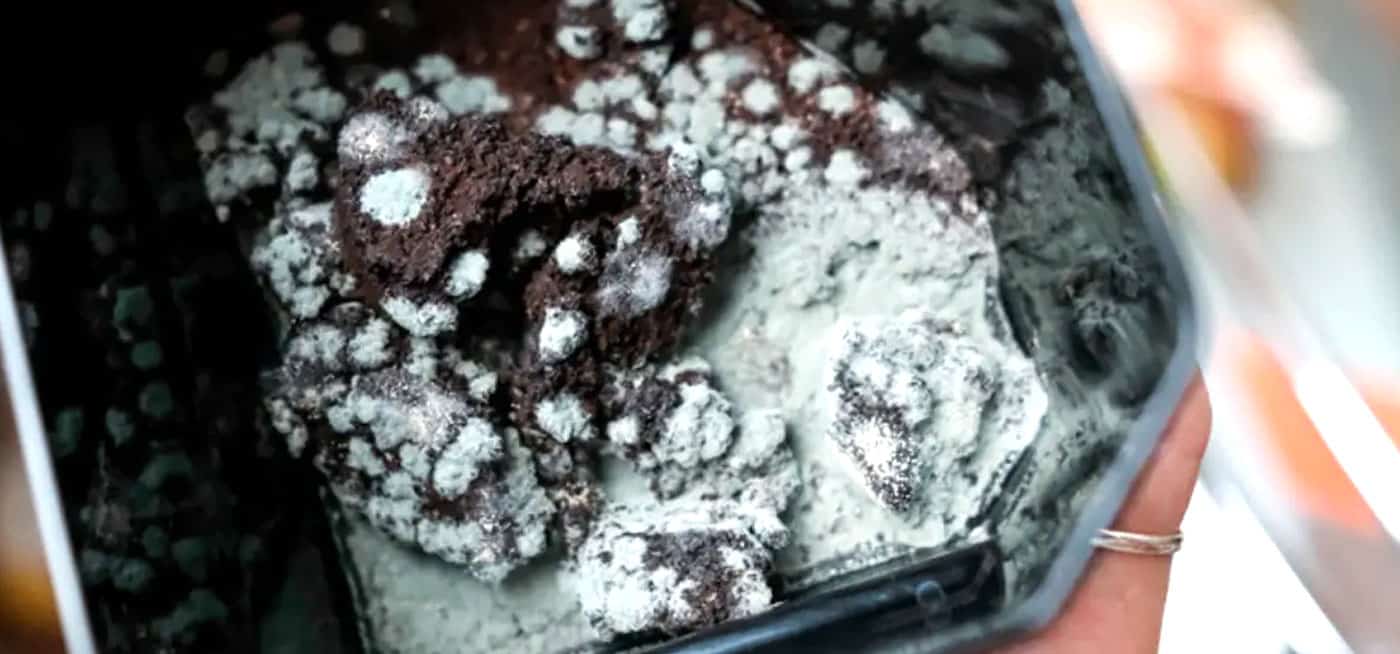
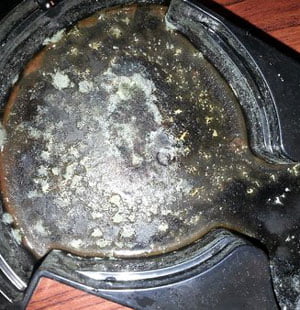
Signs of Mold in Your Coffee
So, how do you know if there’s mold in my Keurig? Here are some signs you should look out for:
- Black specks: Look out for visible signs such as black specks floating around inside your water reservoir or weird discoloration on certain parts of your machine.
- Weird smell: You might even notice an off-putting musty smell emanating from your freshly brewed coffee.
- Unusual taste and texture: If you’re also noticing a different taste that isn’t just under or over-extraction, then you might want to check your machine and coffee beans.
Symptoms of Keurig Sickness
The symptoms of Keurig sickness are similar to those caused by allergies or respiratory infections.
If you notice any of the following symptoms after drinking coffee from your Keurig machine, there is a possibility that the mold in your machine could be causing them:
- Stuffy nose: A common symptom experienced when your nasal passages become congested.
- Watery eyes: Excessive tear production due to irritation or inflammation.
- Sneezing: Uncontrollable bursts are often triggered by irritants like mold spores.
- Wheezing: Difficulty breathing accompanied by whistling sounds while exhaling.
- Coughing: Persistent cough caused by lung irritation.
- Skin rash: Hypersensitivity reaction resulting in redness or itchiness on the skin.
- Headache: Dull or throbbing pain felt anywhere around the head area.
- Sore throat: Discomfort, scratchiness, and irritation when swallowing.
- Heartburn: Burning sensation typically originating behind the breastbone.
- Upset stomach: Nausea and vomiting.
These symptoms may vary depending on an individual’s sensitivity level and exposure time to molds.
It’s worth noting that not everyone will experience these symptoms even if their Keurig coffee machines are contaminated with mold but individuals with existing allergies or asthma can react more severely.
How to Prevent Keurig Sickness
Prevention is always better than cure so here are some steps you want to take to avoid Keurig sickness:
1. Clean your Keurig coffee machine regularly
Keeping a clean environment within your Keurig is crucial for preventing molds from forming. Make sure to wash all removable parts with soapy water weekly and let them air dry before reassembling.
Cleaning the hard-to-reach places is not easy, so a dedicated needle cleaner might also be useful.
2. Change water frequently
Standing water sets up perfect conditions for unwanted elements like fungi to grow. Molds can thrive wherever there is moisture so do remember to not let water sit inside your machine’s reservoir for too long and to replace it with fresh and clean water frequently.
If you know you won’t be using the machine for a few days, empty the water tank and let it dry.
3. Replace filters regularly
Charcoal filters purify the water in your brewer, but their efficiency also wears out over time. So don’t forget to replace them at least every two months. Otherwise, you’re inviting mycotoxins into your coffee.
4. Store your coffee properly
Keeping your coffee beans and grounds away from mold is really important too. Just be mindful of how long you’ve had that coffee on hand.
Also, keep it stored somewhere safe, like an airtight container out of the sun’s reach and away from any high-humidity areas. To know more, you can check out my detailed guide on how to store your coffee beans.
5. Clean your reusable K-cups diligently
If you’re using reusable pods such as DeliBru pods, be sure to give them a good clean after each use. Note that the coffee grounds can also get stuck in the mesh which will expose them to mycotoxins.
Step-by-Step Guide to Cleaning a Moldy Keurig Machine
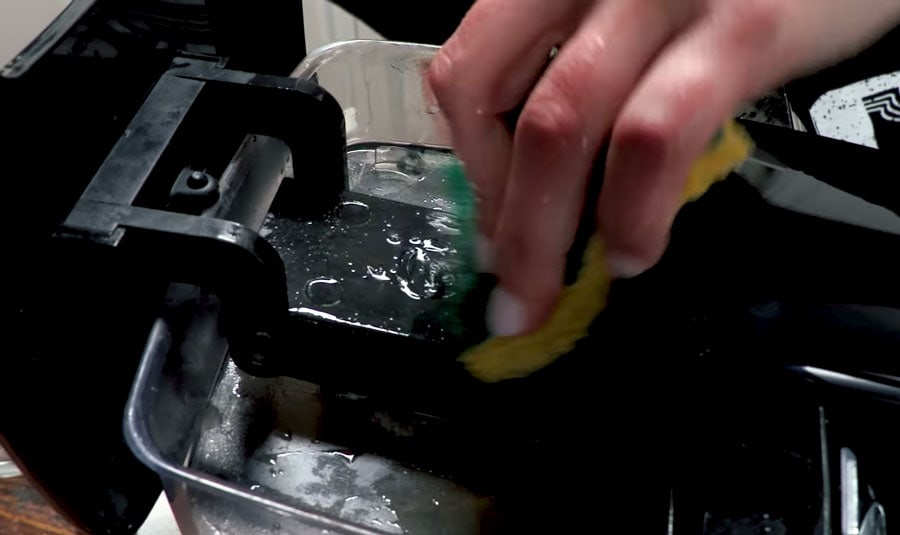
Cleaning a moldy Keurig coffee machine is essential to prevent further health issues and ensure the longevity of your coffee maker. Here is a step-by-step guide to help you get your Keurig back in tip-top shape:
- Gather Your Supplies: Start by gathering all the necessary supplies for cleaning, including dish soap, warm water, white vinegar, a soft cloth or sponge, and a small brush (like an old toothbrush) for hard-to-reach areas. Instead of vinegar, you can also use or descaling solution specifically designed for Keurig coffee makers or other alternatives.
- Unplug and Disassemble: Before beginning the cleaning process, make sure to unplug your Keurig from its power source. Then, disassemble any removable parts such as the water tank and filter holder.
- Clean Removable Parts: Take these removable parts and clean them thoroughly using warm soapy water. Pay close attention to remove any coffee residue or mold growth using your sponge or soft cloth.
- Descale Your Machine: Mineral deposits can accumulate inside your Keurig over time due to regular use of tap water. To eliminate this build-up, run a descaling cycle on your machine following either the instructions provided with the descaling solution or by mixing equal parts white vinegar and water in the reservoir.
- Pour the mixture into the water reservoir.
- Place an empty mug on top of the drip tray.
- Run multiple brew cycles until all of the liquid has been brewed into each consecutive mug.
- For best results, repeat this process twice with plain fresh water immediately after running it with vinegar or a descaling solution. This will help neutralize any residual taste that might be left behind by vinegar.
- Wipe Down The Coffee Maker: While waiting for the descaling process to finish, you can clean the outside of your machine. Simply apply a small amount of warm soapy water to a cloth or sponge and gently wipe down the external surfaces of your Keurig, including the body and control panel. Pay extra attention to hard-to-reach areas around buttons, crevices, and hinges.
- Clean The Needle: A small component that plays a vital role in puncturing K-cups can be challenging to clean but is equally important. Carefully remove both needles using an old toothbrush for brushing out the remaining coffee grinds lodged in them. To get better results you can use some vinegar dabbed on cotton swap. When using this method, rinse properly afterward.
- Dry and Reassemble: Make sure to dry all of the parts completely before reassembling your machine.
- Run Several Brewing Cycles: After cleaning all the removable parts, plug in your Keurig again and run several brewing cycles with just plain fresh water. This helps flush out any residual cleaning solution or vinegar from inside the machine.
- Empty Tank After Each Use: After each use, make sure to empty the water tank to prevent any stagnant water from sitting inside. This step is crucial in preventing mold growth.
Remember to always follow the manufacturer’s instructions when it comes to cleaning and maintaining your Keurig machine.
Frequently Asked Questions (FAQs)
Here are the answers to some common questions about Keurig sickness:
It is unlikely that the mold from a Keurig machine can cause you serious or long-term health problems. But if you already have mold sensitivities or respiratory conditions, you’d want to consult a doctor if you experience any unusual symptoms after consuming moldy coffee.
If you continuously experience recurring issues even after thorough cleanings or notice visible signs of irreversible damage within the machinery such as broken parts, it may be time to consider replacing your machine.
No. Bleach and other harsh chemicals can damage your Keurig machine and are not suitable for cleaning purposes. Stick to gentle yet effective methods such as using vinegar solutions for descaling and warm soapy water for washing removable parts.
While distilled water can potentially reduce mineral buildup compared to tap water by minimizing limescale accumulation inside your coffee maker, solely relying on distilled water does not guarantee complete prevention of mold growth. Regularly cycling fresh water through your machines along with proper cleaning routines is essential regardless of which type of water you use for your coffee.
While both the Keurig and Nespresso machines can grow mold, complaints about a moldy Keurig are more common, hence the Keurig sickness term. The best practice whether you have a Keurig or Nespresso is to give your machine a good clean regularly.
Yes, if left uncleaned, your manual coffee makers can also grow mold. The advantage of manual brewers over automatic coffee machines is that you can disassemble their parts, making cleaning easier.
Final Words
Keurig sickness is a real concern for us coffee lovers. We don’t want our favorite brew, which is supposed to give us health benefits, to instead be the cause of our illnesses. Through your coffee’s exposure to mold, you can suffer from nasal stuffiness to skin irritation, mimicking those of a common cold.
But don’t fret, there are signs and measures that you can take to prevent mold from growing within your machine. Aside from regularly cleaning your machine and changing its water, you also want to store your coffee beans properly— in an airtight container that’s free from humidity and sunlight.
Yes, Keurig mold can be a headscratcher if left unchecked, but it doesn’t have to be. Build the right maintenance routine on your brewing journey and you’ll be A-okay.


Fascinating read. However, I’m a bit puzzled about the tech aspect—are there any advanced Keurig models that have self-cleaning features to prevent mold? An automatic cleaning cycle seems like an ideal solution to this problem. It’d be interesting to know if the industry is moving towards that.
Whoa, I never pegged my daily cup of Joe as a health hazard until I read this. Has anyone actually gotten seriously ill from Keurig sickness, or is it more about mild discomfort? Curious how common this really is.
This article was a real eye-opener. I’ve always been vigilant about cleaning my equipment, but I didn’t realize how quickly mold can grow in a Keurig. Thanks to this piece, I now have a step-by-step guide to tackle my machine’s mold problem. Cheers Tom, for potentially saving me from Keurig sickness. My immune system is not the best, so this might have saved me from bad things.
You’re very welcome, I’m glad the article was useful for you,
I enjoyed your FAQs, Tom. They covered questions that I didn’t even know I had. What I’d love to see added though, is a list of signs indicating when it’s time to replace a Keurig machine entirely. Is there a point where no amount of cleaning can save it?
Hey everyone, as someone who works with food safety, I can’t stress enough how important this information is. The scary part is that this isn’t just limited to Keurig machines. Regular maintenance and proper cleaning are crucial for any kind of kitchen equipment, be it at home or in professional settings.
I knew about the mold issue but had no clue about the bacteria. Could you clarify whether bacteria are as common as mold in these machines, and should we be equally worried about them?
My Keurig did have a strange smell the other day, and lo and behold, after reading this, I checked and found mold. Went straight for the vinegar and followed your cleaning guide. It’s like I’ve got a brand new machine now—thankful for your detailed prevention tips.