How to Roast Coffee Beans At Home: A Beginner’s Guide
If you are a coffee lover who has been grinding roasted coffee beans for some time now, you’ve probably wondered, “What if I take it a step further and roast my own coffee beans?”
Roasting coffee at home may sound complicated and intimidating but it doesn’t have to be. In fact, it can be simplified in just a few steps.
From what equipment and ingredients are necessary, to a step-by-step roasting process – let me guide you in this mission to roast your first batch of coffee beans at home.
Why Roast Coffee Beans at Home?
Being able to roast your own coffee beans at home offers a host of benefits and can be an incredibly thrilling experience for any java enthusiast.
Roasting coffee is essentially the process of turning green, unroasted beans into delicious roasted beans that you can enjoy as a cup of coffee.
If done correctly, you’ll
- have more control over the flavor potential of your beans compared to anything pre-packaged from a store or coffee shop,
- realize significant cost savings, and
- always have freshly roasted coffee beans at home, so you’ll never have to look at the “expires on” label again.
- bragging rights when a friend has coffee at your house from your own roast 🙂
The idea of taking raw materials and transforming them into something special has always fascinated me, and it looks like you as well.
Click here for a comprehensive look at the roasting process of coffee.
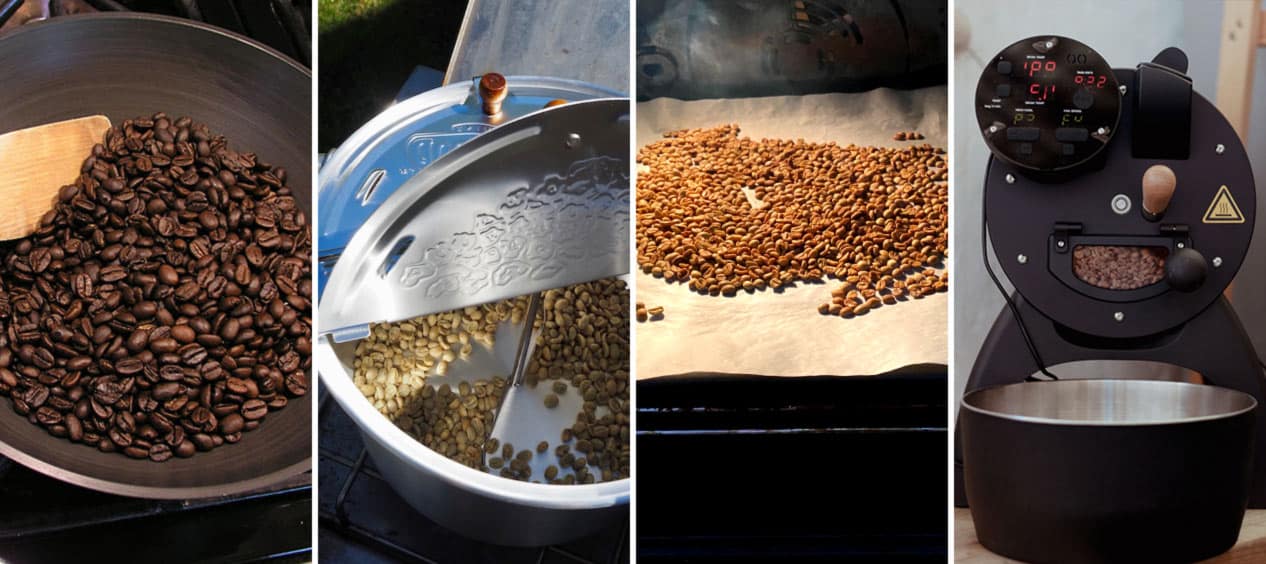
4 Types of Home Roasting Methods
There are multiple ways to roast your coffee beans at home, let me summarize them for you.
| Method | Pros | Cons |
|---|---|---|
| Pan | Simple and convenient Accessible equipment Affordable method | Gets very smoky It’s hard to get the right temperature |
| Oven | Simple and convenient Accessible equipment Affordable method | It takes longer for the beans to roast Gets very smoky |
| Stove-top popcorn poppers | Agitates the beans automatically for a perfect roast | Some popcorn machines can break after roasting a few times Can be a home hazard Constant winding for 10+ minutes can get tiring |
| Purpose-built home coffee roaster | Agitates the beans automatically for a perfect roast Perfect control of temperature Long-lasting | Expensive machine |
In terms of storage life – once roasted – coffee beans should last about three to five months stored in an airtight container, but they are at their peak for up to 1 month after roasting.
Click here to learn more about coffee beans’ shelf life.
What You Need To Get Started
To get started in roasting coffee beans at home, you’ll need the right tools and supplies. Fortunately, you can easily find these online or in stores. Some may already be in your kitchen.
- Heat source and equipment – the equipment you need depends on your home roasting method as I mentioned above:
- a pan and stovetop grill,
- an oven,
- a popcorn machine, or
- a home coffee roaster.
- Green coffee beans – since your raw beans can come in many varieties, I recommend that you start with smaller amounts until you figure out which ones would work best for your palate. You can’t go wrong with single-origin Arabica beans from Ethiopia.
- A pair of metal colanders – these are handy tools to cool down the roasted coffee beans. Don’t use plastic colanders as they can melt.
- Airtight container for storing – be sure to get an opaque container that will keep your beans safe from light, heat, and moisture.
Step-by-step Guide to Roasting Cofee Beans at Home
Make sure your first try at roasting coffee beans is as precise and neat as possible. To achieve this, you’d have to make the necessary preparations and have an understanding of the different stages of the roasting process.
When I first roasted coffee beans, it turned out bad. I charred the beans, since I wasn’t ready and didn’t have everything planned out. But luckily, you will 🙂
Let’s start with preparing your workspace.
1. Prep your roasting workspace.
First, you need to make sure that you have a safe and well-ventilated area for roasting. This could be an outdoor space such as a balcony or patio, or inside in an open room where there is plenty of ventilation.
Clear away any flammable materials which may cause a fire risk when exposed to high heat sources like grills and ovens. Prepare your heat source, whether it’s using a grill or stovetop pan, oven method, popcorn machine, or home coffee roaster according to instructions from the manufacturer’s manual.
2. Preheat the roaster
Before putting the green beans into the roaster, you need to preheat it to what is called the “charge temperature”.
Set up your heat source for about 350°F (176.6°C).
Know that as soon as you put the beans into the roaster, the temperature will suddenly drop. This simply means that if you are roasting a lot of beans, you want to set the temp slightly higher.
3. Roast your coffee.
With your roaster at the 350°F charge temp, you are ready to pour the beans into the roaster.
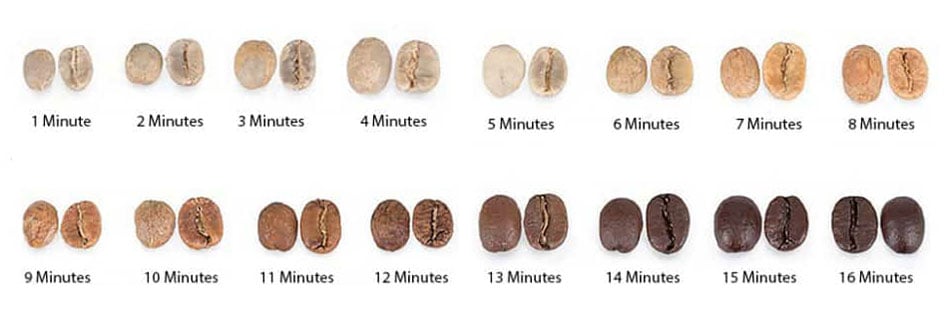
To understand how quickly you can roast your beans, familiarize yourself with the three distinct phases that occur during the roasting process: color change, first crack, and second crack. Also, read up on the Maillard reaction.

Monitor closely in the first few minutes if the colors change on the bean surface.
Soon you will see even hints of yellowish-brown notes appear on any one side of each bean. If you’re using the Pan Method, stir your beans continuously. The Popcorn Machine and Home Coffee Roaster methods will agitate the beans automatically for a consistent roast.
4. Listen for the first and second cracks.
After about 4 minutes, you will hear “first crack” sounds – these are small popping noises produced by the release of pressure within air trapped inside each bean. This means you now have lightly roasted coffee beans.
Then continue roasting a little more until you hear the “second crack” noise which indicates deeper darker tones produced due to further carbonization caused by higher temperatures. At this point, your beans are now medium-roast.
Keep roasting to reach your desired roast level beyond light and medium roasts.
5. Let them cool and store the coffee beans right.
Once your beans are roasted to the desired level, it’s important to quickly cool them down with air so that aromas do not escape due to degassing.
Shake them between two metal colanders to cool the beans down quickly and to help remove the chaff from the beans.
Then, store your cooled beans in an airtight container away from any light source as heat can affect their flavor profiles negatively over time. Allowing a few days for “settling” of flavors before grinding and brewing is also highly recommended for the best coffee experience.
Troubleshooting Tips
As with any skill, roasting those beans at home can be a bit tricky to master. To help prevent you from feeling discouraged or overwhelmed while learning the art of craft coffee roasting, here are some helpful troubleshooting tips that I found useful:
- Make sure you have all of your equipment ready before beginning. Keep an eye on your roast time as green beans can easily burn when roasted for too long.
- Use fresh green coffee beans whenever possible – old and stale beans that have been in storage for over a year won’t produce the same flavor.
- Properly calibrating your equipment is crucial so that all your batches end up with similar results regardless of what kind of roast profile you’re aiming for.
- Store your coffee beans properly after each session – keep them in an airtight container away from direct sunlight or moisture.
- Don’t forget about quality control once finished. Sample every batch in order to adjust any settings that might need tweaking and ensure repeatable quality over multiple batches.
FAQs
Conclusion
As with anything in life, practice makes perfect, and that’s certainly true when it comes to roasting coffee beans at home. The more you do it, the better your results will be. It will get messy when you start out, but there’s nothing to worry about. It’s all part of the learning curve.
That’s why you need to be prepared with a good workspace with proper ventilation; the equipment you need for the roasting method of your choice; and of course, the right green beans to get you started.
Just listen closely for those cracking sounds and you’ll master home-roasting coffee beans in no time.